Co-Immunoprecipitation (Co-IP) is one of the most classical and widely used in vivo methods for validating protein–protein interactions in life science research.
YBioHub presents a complete Co-IP workflow guide covering the principle, classifications, experimental procedures, result interpretation, troubleshooting, and key precautions to help you successfully perform protein interaction experiments.
I. Basic Overview of Co-IP1. Principle
Under native cellular conditions, if protein A interacts directly or indirectly with protein B, immunoprecipitation of protein A using a specific antibody will also co-precipitate protein B.
The presence of protein B can then be detected by Western blot, indicating a potential interaction between the two proteins.
According to the experimental purpose, Co-IP is generally divided into two categories:
① Endogenous Co-IP
Detects interactions between proteins naturally expressed in cells.
② Exogenous Co-IP
Detects interactions after co-expression of two target proteins in cells.
2. Common Detection Methods
Currently, purified Protein A/G (or a combination of both) immobilized on agarose or magnetic beads is commonly used.
Protein A/G specifically binds antibodies, thereby capturing and purifying antigen–protein complexes. This approach is widely used for validating intracellular protein interactions and screening novel interacting partners.
Protein A/G specifically binds to the Fc region of immunoglobulins, allowing antibody-mediated capture of target proteins and their interacting partners.
3. Advantages and Limitations
Advantages of Co-IP
• Interacting proteins maintain their native post-translational modifications.
• Protein interactions occur under physiological conditions with minimal artificial interference.
• Native protein complexes can be isolated and analyzed.
Limitations of Co-IP
• Difficult to detect weak or transient interactions.
• Cannot distinguish direct interactions from indirect interactions mediated by third-party proteins.
• Requires prior prediction of target proteins and appropriate antibody selection.
II. Experimental Procedure General workflow: Protein extraction → Input sample preparation → Incubation with antibody → Binding to Protein A/G beads → Elution → WB or LC-MS/MS analysis01 Protein Extraction
1.1 Animal Cells
1. Culture target cells to appropriate density and collect cells.
2. Wash cells 2–3 times with pre-chilled PBS buffer and add 300–500 μL pre-chilled IP lysis buffer containing freshly added protease inhibitor.
3. Incubate on a rotator at 4°C for 30 min.
4. Sonicate on ice until the solution becomes clear.
5. Centrifuge at 12,000 rpm for 15 min at 4°C and transfer the supernatant to a new tube.
1.2 Animal Tissues
- Wash fresh tissues with pre-chilled PBS.
- Grind tissues thoroughly in liquid nitrogen.
- Add pre-chilled IP lysis buffer and protease inhibitor.
- Sonicate on ice until the lysate becomes clear.
- Centrifuge at 12,000 rpm for 15 min at 4°C and collect supernatant.
02 Input Sample Preparation
- Mix 30 μL lysate with 1× SDS-PAGE loading buffer and heat at 95°C for 5–10 min.
- Validate target protein expression by Western blot.
03 Incubation of Total Protein with Antibody
- Divide lysates into IP experimental and IgG control groups.
- Add IP-grade antibody to the experimental group and Normal IgG antibody to the control group.
- Incubate at 4°C for 4 h or overnight.
04 Binding of Protein A/G Beads
- Pre-wash Protein A/G beads using wash buffer.
- Place on magnetic rack and discard supernatant.
- Repeat washing once.
- Add protein-antibody complexes to beads and incubate at 4°C for 2 h.
- Wash beads thoroughly with wash buffer.
05 Protein Elution
5.1 Denaturing Elution
- Add 1× SDS-PAGE loading buffer to beads and heat at 95°C.
- Collect supernatant for SDS-PAGE or WB analysis.
5.2 Non-denaturing Elution
- Add elution buffer and incubate at room temperature.
- Centrifuge and collect supernatant.
- Store at -80°C or proceed to WB or LC-MS/MS analysis.
06 Western Blot Detection
6.1 Detection of Target Proteins
Use Anti-A and Anti-B antibodies to detect proteins in precipitated complexes.
Detection of both bait and prey proteins suggests a potential interaction.
Electrophoresis → Transfer → Blocking → Washing → Primary antibody incubation → Washing → Secondary antibody incubation → Washing → Imaging
6.2 Mass Spectrometry Analysis
LC-MS/MS can identify proteins present in IP eluates and screen for unknown interacting partners.
III. Interpretation of Co-IP ResultsIgG Control Group
Non-specific IgG of the same species and isotype as the IP antibody is used to:
- Exclude non-specific binding
- Serve as a reference for IgG heavy/light chain bands
- Validate the effectiveness of the IP procedure
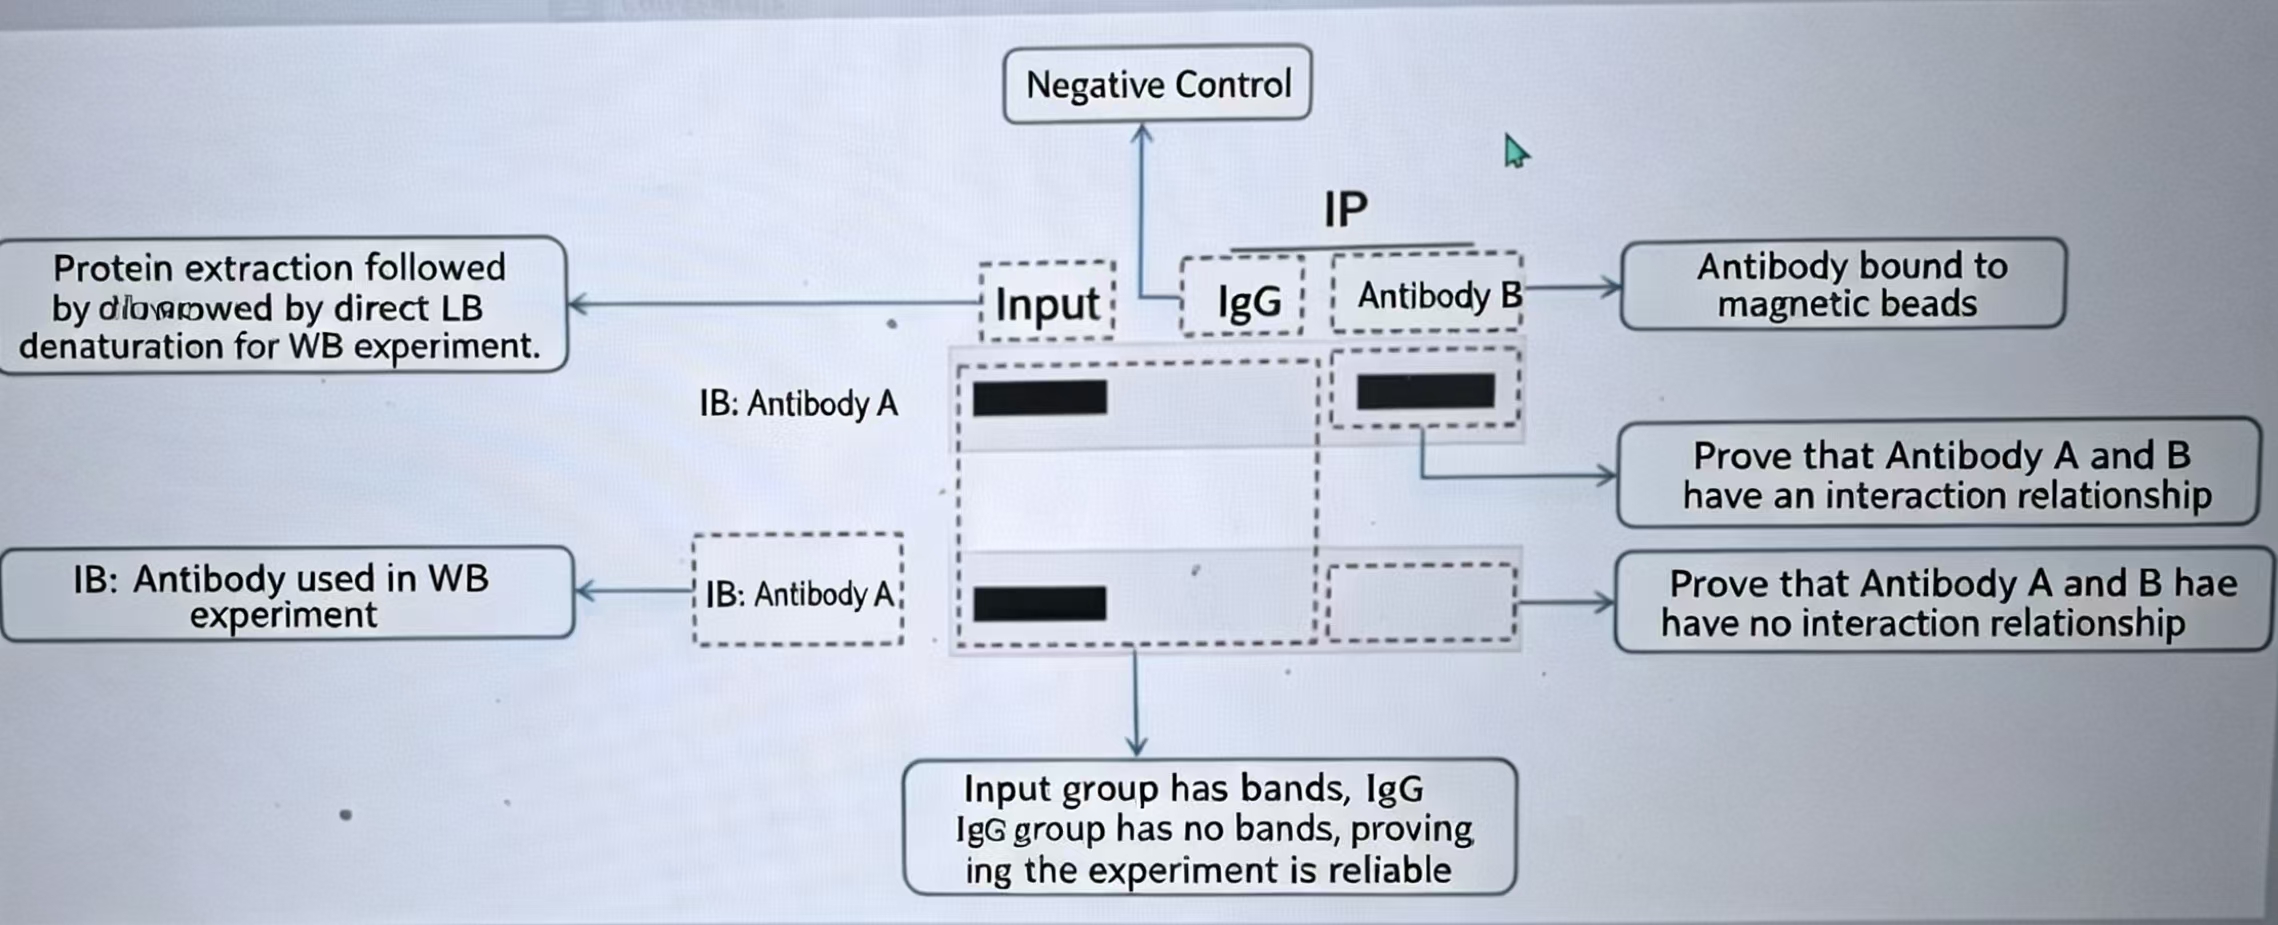
Figure: Co-IP Result Interpretation Diagram
1. Common Problems
(1) No target band or weak band
- Low protein expression or weak interaction
- Harsh lysis conditions disrupting interactions
- Poor antibody quality
- Excessive washing
(2) Non-specific bands
- Non-specific antibody binding
- Insufficient washing
- Protein aggregation
- IgG heavy/light chain interference
(3) Input positive but IP negative
- Antibody cannot recognize native protein conformation
- Lysis buffer disrupts interaction
- Weak or transient interaction
(4) Severe IgG heavy/light chain interference
Primary and secondary antibodies recognize the same IgG species.
Solution: use light-chain-specific secondary antibodies or tag-based IP.
(5) Protein degradation
- No protease inhibitors added
- Excessive processing time
- Repeated freeze–thaw cycles
(6) Bead aggregation
- Incomplete lysis
- Excessively concentrated samples
- Excessive non-specific protein adsorption
(7) Poor reproducibility
- Inconsistent experimental conditions
- Antibody batch variation
- Inconsistent cell conditions
2. Precautions
- Always add protease inhibitors and keep samples on ice.
- Select appropriate IP-grade antibodies.
- Use suitable elution buffers with proper strength and pH.
- Excessive washing may reduce signal intensity, while insufficient washing increases background.
- Antibodies may co-elute with proteins, causing heavy/light chain contamination.
🔬 More biotech insights: Visit our Blog